Build an AI Chatbot that Integrates Email Support
Learn how to build an AI chatbot that seamlessly integrates email support, allowing users to book demos, get live customer assistance, and chat with a knowledgeable agent. Optimize your chatbot for SEO, readability, and engagement.
December 8, 2025
Streamline your customer support with an AI chatbot that seamlessly integrates email functionality. This powerful solution allows you to efficiently handle inquiries, book demos, and provide personalized assistance, all within a single conversational interface. Discover how to build this versatile chatbot and elevate your customer experience.
Build a Conversational Pipeline: Chatbot with Email Support
Setting Up the Chatbot Structure
Integrating Calendly for Demo Booking
Handling Email Customer Support
Implementing a Knowledge-Based Chat Assistant
Conclusion
Build a Conversational Pipeline: Chatbot with Email Support
Build a Conversational Pipeline: Chatbot with Email Support
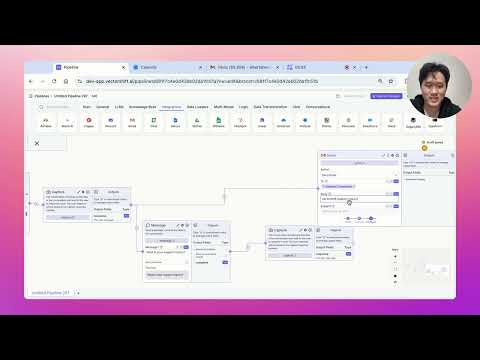
In this section, we will walk through the process of building a conversational pipeline that includes a chatbot with email support functionality. This type of pipeline is commonly used for website chatbots, where users are presented with various options to interact with the chatbot.
The key steps involved in building this pipeline are:
-
Start the Conversation: We begin by adding a "Start" flag to the pipeline, which defines the starting point of the conversation.
-
Present Initial Options: We then use a "Message" node to display a message to the user, asking how they would like to proceed. This is followed by a "Button" node that presents the user with three options: "Book a Demo", "Email Customer Support", and "Chat with Chatbot".
-
Handle "Book a Demo" Option: If the user selects the "Book a Demo" option, we use an "IFrame" node to embed a Calendly link, allowing the user to schedule a demo.
-
Handle "Email Customer Support" Option: If the user selects the "Email Customer Support" option, we first ask for the user's email address using a "Capture" node. We then ask for the user's support inquiry using another "Capture" node. Finally, we use a "Gmail" node to send an email to the specified email address with the user's inquiry.
-
Handle "Chat with Chatbot" Option: If the user selects the "Chat with Chatbot" option or sends a message directly, we use a "Knowledge Base" node to query a knowledge base (in this case, the Vector Shift homepage) based on the user's input. We then use an "OpenAI" node to generate a response based on the context from the knowledge base and present it to the user. We also include a loop to allow the user to ask additional questions.
By following this step-by-step approach, you can build a robust conversational pipeline that provides users with a variety of options to interact with your chatbot, including the ability to schedule a demo, submit support inquiries, and engage in a conversational experience.
Setting Up the Chatbot Structure
Setting Up the Chatbot Structure
The first step in building the conversational pipeline is to define the start of the conversation. This is done by adding a "Start" flag to the pipeline, which indicates the beginning of the chatbot interaction.
Next, a "Message" node is used to present the initial message to the user, such as "How can I help you today?". This sets the tone for the conversation and provides the user with a clear starting point.
To give the user options to choose from, a "Button" node is added. This allows the user to click on predefined buttons, such as "Book a Demo", "Email Customer Support", or "Chat with Chatbot". Each of these buttons will lead the conversation down a different path.
To enable the user to type their own message instead of just clicking on buttons, the "Allow User Message" feature is toggled on. This allows the user to enter their own input at this step of the conversation.
By setting up this initial structure, the chatbot can now branch off into different directions based on the user's selection or input, allowing for a more personalized and interactive experience.
Integrating Calendly for Demo Booking
Integrating Calendly for Demo Booking
To integrate Calendly for demo booking in the conversational pipeline, follow these steps:
- Obtain the Calendly iframe URL for the desired demo booking page.
- In the "Book a Demo" branch of the conversational pipeline, use a "Message" node to embed the Calendly iframe.
- Paste the Calendly iframe URL into the "Enter URL here" field of the "Message" node.
- This will display the Calendly booking interface directly within the chatbot conversation, allowing users to schedule a demo seamlessly.
By integrating Calendly, you can provide a streamlined demo booking experience for your users without requiring them to navigate away from the chatbot interface.
Handling Email Customer Support
Handling Email Customer Support
To handle the "Email Customer Support" path in the conversational pipeline, we'll follow these steps:
- Ask the user for their email address and capture their response.
- Ask the user for their support inquiry and capture their response.
- Send an email to the user's email address with the support inquiry details.
- Send a confirmation message to the user in the chat.
First, we'll ask the user for their email address using a message node and capture their response using a capture node:
What is your email address?
Next, we'll ask the user for their support inquiry and capture their response:
What is your support inquiry?
Now, we'll use a Gmail node to send an email to the user's email address (stored in the capture0.response variable) with the subject "Vector Shift Support Inquiry" and a body that includes the user's inquiry (stored in the capture1.response variable):
To: {{capture0.response}}
Subject: Vector Shift Support Inquiry
Body: Hi Vector Shift user,

We will respond to your inquiry within 24 hours. Your inquiry is: {{capture1.response}}

Best,
Albert
Finally, we'll send a confirmation message to the user in the chat:
The support ticket has been created. We will respond within 24 hours.
This completes the "Email Customer Support" path in the conversational pipeline.
Implementing a Knowledge-Based Chat Assistant
Implementing a Knowledge-Based Chat Assistant
To implement a knowledge-based chat assistant, we'll follow these steps:
-
Create a Knowledge Base: We'll create a new knowledge base and scrape the Vector Shift homepage to populate it with relevant information.
-
Capture User Input: We'll use a capture node to wait for the user's input and store it in a variable.
-
Query the Knowledge Base: We'll use the user's input to query the knowledge base and retrieve the most relevant information.
-
Generate a Response: We'll pass the user's input and the knowledge base context to an OpenAI language model to generate a relevant response.
-
Present the Response: We'll display the generated response to the user using a message node.
-
Loop Back: Finally, we'll create a loop to allow the user to ask additional questions, repeating the process from step 2.
This approach allows us to build a conversational chatbot that can provide information and answers based on the knowledge base, while also allowing the user to engage in a back-and-forth dialogue.
Conclusion
Conclusion
The conversational pipeline presented in this tutorial demonstrates a robust and versatile approach to building a website-style chatbot. By leveraging the various nodes and features available in the Vector Shift platform, the chatbot can seamlessly handle different user interactions, such as booking a demo, requesting customer support, and engaging in a conversational exchange.
The key aspects of this pipeline include:
- Initial Message and Buttons: The chatbot starts by presenting the user with a clear set of options, allowing them to choose their desired action.
- Email Support Workflow: When the user selects the "Email Customer Support" option, the chatbot guides them through the process of providing their email address and support inquiry, and then automatically sends an email to the support team.
- Conversational Interaction: For the "Chat with Chatbot" option, the chatbot utilizes a knowledge base and a language model to engage in a natural conversation, answering the user's questions based on the provided context.
- Looping Functionality: The chatbot is designed to loop back to the beginning of the conversational segment, enabling the user to ask additional questions and continue the dialogue.
This comprehensive approach demonstrates the power and flexibility of the Vector Shift platform in building sophisticated conversational experiences that cater to the diverse needs of website visitors.
FAQ
FAQ